Difference between revisions of "Fresnel Forms Protégé plugin"
(sort and nest →Tips & Tricks) |
|||
| (3 intermediate revisions by the same user not shown) | |||
| Line 85: | Line 85: | ||
## After selecting the ‘Expand all’ menu item select also the ‘rearrange’ menu item to be sure that the lenses do not overlap. | ## After selecting the ‘Expand all’ menu item select also the ‘rearrange’ menu item to be sure that the lenses do not overlap. | ||
# In a form, for properties (not of type page) with multiple values, separate values by a comma. Separate URL's for an image property by a space, then a comma. | # In a form, for properties (not of type page) with multiple values, separate values by a comma. Separate URL's for an image property by a space, then a comma. | ||
| + | |||
| + | == User Manual == | ||
| + | |||
| + | === Getting Started === | ||
| + | |||
| + | ====Startup ==== | ||
| + | |||
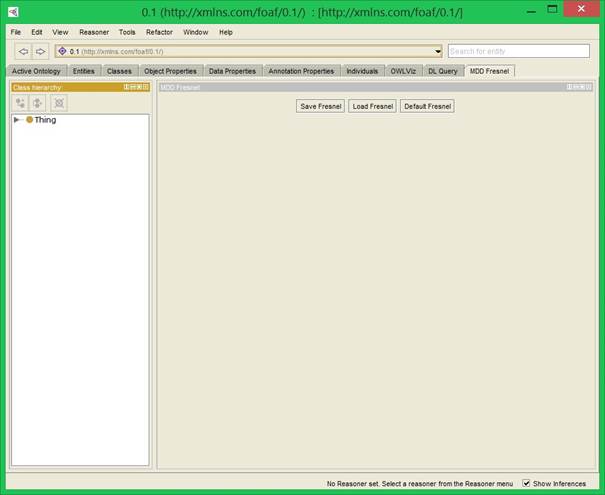
| + | If, at the start of Protégé ,the tab of the plug-in is not among the other tabs in Protégé, the user must select the plug-in under 'Window > Tabs'. Next, the user must load the desired ontology into Protégé via 'File > Open', either via a URL or a local file. After this, the user can navigate to the plug-in tab where the Start menu is displayed. | ||
| + | |||
| + | [[File:FFstartup.jpg]] | ||
| + | |||
| + | ====Default Fresnel ==== | ||
| + | |||
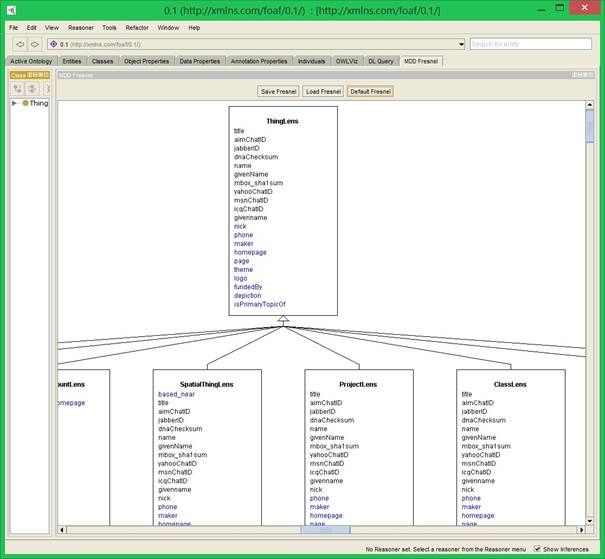
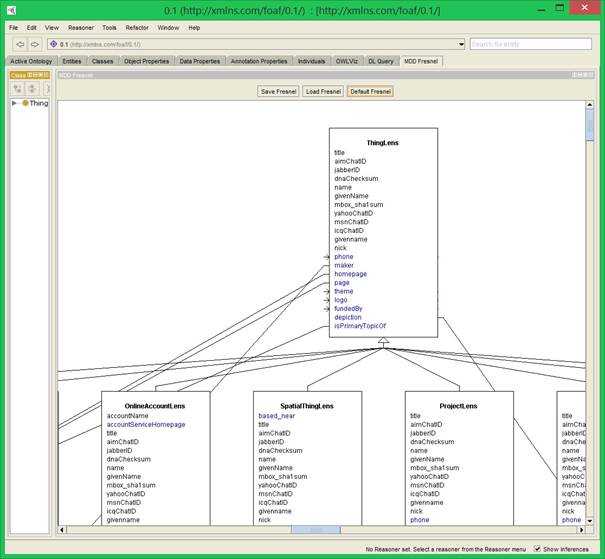
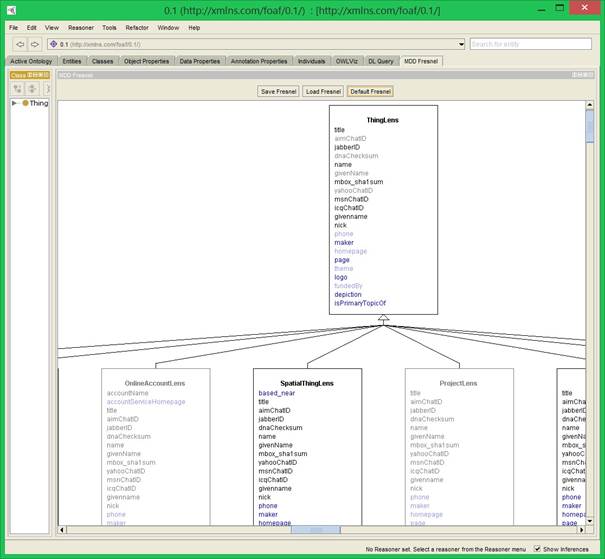
| + | The option 'default Fresnel' will generate a diagram that visually displays default Fresnel data for the loaded ontology. For each class, a lens is generated and represented by a 'box' in which all associated Properties appear in a list: the data properties in black, the object properties in blue. The lenses are structured hierarchically, in which the parent/child relations are indicated according to UML notation. The range of the object-Properties is visible when the mouse is above the specific lens box. | ||
| + | |||
| + | [[File:FFdefault.jpg]] | ||
| + | |||
| + | [[File:FFrange.jpg]] | ||
| + | |||
| + | ====Load Fresnel ==== | ||
| + | |||
| + | The 'Load Fresnel' option prompts the user to select an already existing Fresnel file. The file to be loaded must contain Fresnel data that fits with the already loaded ontology. If you want to read a Fresnel file that applies to another ontology, then first load that particular ontology into Protégé. After the file is selected, the diagram with the graphic representation of the Fresnel data displayed that the user last edited and saved. Hidden properties are displayed in gray, at the bottom of the list in the lens box (see 'Hide'). | ||
| + | |||
| + | ====Save Fresnel ==== | ||
| + | |||
| + | The 'Save Fresnel' option will save the Fresnel data from the chart - either default or edited - into a local Fresnel file. If the diagram has been edited by the user, all graphical data such as positions of lens boxes, sequences of properties and more will also be stored. | ||
| + | |||
| + | === Structure === | ||
| + | |||
| + | ====Moving and adjusting order ==== | ||
| + | |||
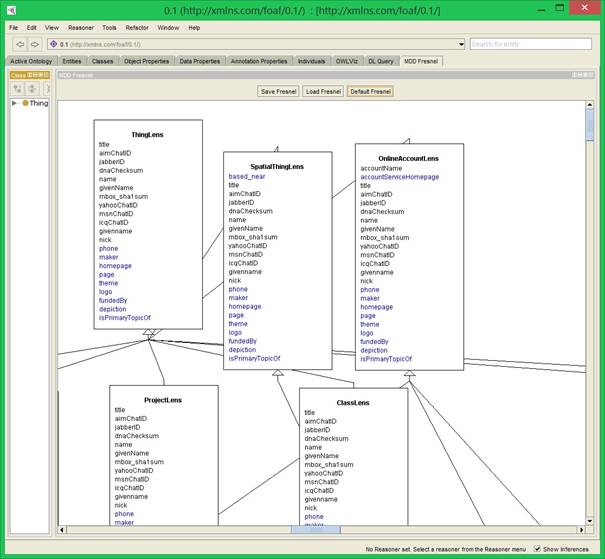
| + | The lens boxes can be moved by moving them with the mouse. Adjusting the order of the properties is done in the same way. When lens boxes are placed over each other, they will automatically be assigned a place so that there is no overlap. | ||
| + | |||
| + | [[File:FForder.jpg]] | ||
| + | |||
| + | ===='Hide' (Properties And Lenses) ==== | ||
| + | |||
| + | Clicking a property determines the visibility of a property (based on the Fresnel-property 'ShowProperties'). A property that should not be included will be grayed out after clicking. Also, a lens can be included or not and this one can do it by right-clicking the lens box button and the option 'Hide'. A lens that is not included are also grey. | ||
| + | |||
| + | [[File:FFhide.jpg]] | ||
| + | |||
| + | ===='Add Property' (lens) ==== | ||
| + | |||
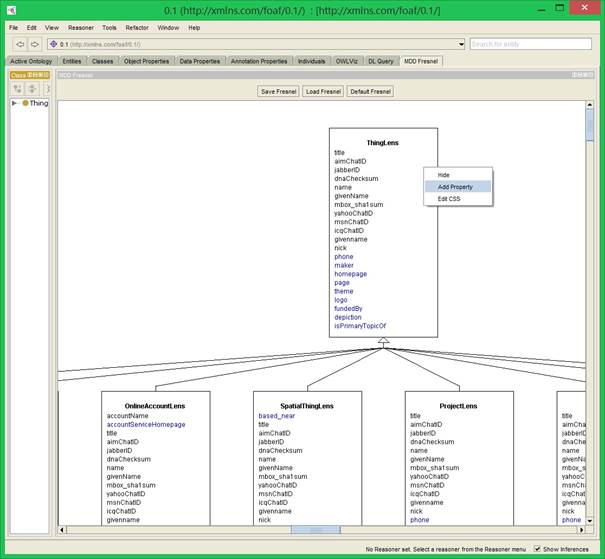
| + | The next option in the second mouse button menu is 'Add property, with which one can easily add a property to the clicked Lens. To do this, you must enter the name and URI of the property and the place (index) of the property in the lens box. The new Property in the list on the correct spot. | ||
| + | |||
| + | [[File:FFcss.jpg]] | ||
| + | |||
| + | === Appearance === | ||
| + | |||
| + | ==== 'Edit CSS' (lens) ==== | ||
| + | |||
| + | The last option in the same menu is 'Edit CSS', in which five values for CSS style data can be filled in for a lens. This does not change the diagram, but this data gets included in the Fresnel file (see 'Save Fresnel'). | ||
| + | |||
| + | ===='Relabel' (property) ==== | ||
| + | |||
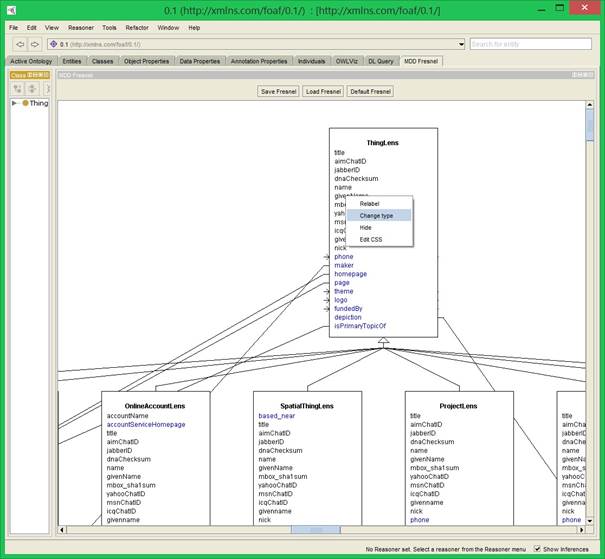
| + | If you right-click on a property, a different menu is displayed specifically for the clicked property. The first option 'Relabel' Designates another value to the Fresnel-property ' abel'. The result is visible afterwards The Clicked property. | ||
| + | |||
| + | ===='Change type' (property) ==== | ||
| + | |||
| + | The next option in the same 'Change type' menu provides a list of types for the property. If you make a different choice for the type, this is not displayed visually, but is included in the saved Fresnel file (see 'Save Fresnel'). | ||
| + | |||
| + | ===='Hide' (property) ==== | ||
| + | |||
| + | The next option in that menu does the same as a left mouse button on a property (see 'Hide'). | ||
| + | |||
| + | ===='Edit CSS ' (property) ==== | ||
| + | |||
| + | The last option in the menu, 'Edit CSS', gives the ability to fill in four values for CSS style data for a property. This does not change the diagram, but this data is included in the Fresnel file (see 'Save Fresnel'). | ||
| + | |||
| + | [[File:FFproperty.jpg]] | ||
Latest revision as of 13:50, 2 October 2018
Contents
Publication
Lloyd Rutledge, Thomas Brenninkmeijer, Tim Zwanenberg, Joop van de Heijning, Alex Mekkering, J. N. Theunissen and Rik Bos. From Ontology to Semantic Wiki – Designing Annotation and Browse Interfaces for Given Ontologies, Volume 9507 of the series Lecture Notes in Computer Science, pp 53-72, 16 April 2016.
Software Description
This is a deprecated version of Fresnel Forms. The functionality from this version is being merged into a renewed Semantic MediaWiki extension: Fresnel Forms SMW extension.
Fresnel Forms (FForms) is a plugin for the Protégé ontology editor that helps create Fresnel-defined interfaces, and exports them as semantic wiki's. FForms generates default Fresnel interface code for the ontology currently loaded in Protégé. This plugin then provide a GUI for editing Fresnel-defined interfaces. Finally, Fresnel Forms exports Fresnel-defined interfaces as semantic wikis. These wikis provide both browsing of existing data and form-based annotation interfaces for adding new data.
Fresnel Forms can be downloaded and installed from https://github.com/ABI-Team-30/Fresnel-Forms.
We have applied FForms to the entire DBpedia ontology to generate Fresnel style and a corresponding wiki interface for it. The files involved are:
- http://downloads.dbpedia.org/2014/dbpedia_2014.owl.bz2 : The full DBpedia ontology loaded into Fresnel Forms.
- File:Dbp complete.n3.zip: The default Fresnel code that Fresnel Forms generates from this ontology.
- http://is.cs.ou.nl/OWF/files/FresnelForms/dbp_complete.xml.zip: The wiki interface that Fresnel Forms generates from this default Fresnel code.
Installation Fresnel Forms for End Users
- Download and install MediaWiki
- Download and install these MediaWiki extensions:
- Adjust your MediaWiki installation with the following steps:
- Add to your wiki's LocalSettings.php file the following line:
$wgAllowImageTag=true; - Copy the content of Default_CSS_Fresnel_Forms and paste into MediaWiki:Common.css
- Add to your wiki's LocalSettings.php file the following line:
- Download and install Protégé 5.0 beta 17
- Copy and paste the Fresnel Forms .jar file in your Protégé /plugins directory
- Start Protégé.
- If Protégé does not show the Fresnel Forms tab, select the Fresnel Forms tab from the Protégé pull-down menu Window / Tabs
- If you get the error "Couldn't load view plugin" then simply load the view yourself:
- Click the message away on the 'x'. You then have an empty Fresnel Forms tab, without any view.
- Select the Fresnel Forms view from the Protégé pull-down menu / Window / Views / Ontology Views / Fresnel Forms
- Place the Fresnel Forms view in the Fresnel Forms tab
Compatibility
Fresnel Forms has been tested with the following software versions:
| Product | Version |
|---|---|
| Protégé Desktop (or Git master branch) | 5.0.0-beta-15 or 5.0.0-beta-16-SNAPSHOT from Git (tested up to commit dcddbf6e815aff1cffd56de414bdd0d7512fd901) |
| MediaWiki | 1.19.14+dfsg-1 |
| PHP | 5.5.9-1ubuntu4.6 (apache2handler) |
| MySQL | 5.5.41-0ubuntu0.14.04.1 |
| Semantic Forms | 2.8 |
| Semantic MediaWiki | 2.0 |
| Character Escapes | 0.9.1 |
| Parser Functions | 1.4.1 |
These were the software versions which were up-to date for Ubuntu 14.04.2 LTS at 2015-02-22.
Tips & Tricks
- Documentation
- To generate the project documentation locally, you can execute ‘mvn site’. After that, the resulting documentation will be present in the target/site folder of the source folder. The entry point for the documentation is index.html.
- Read the document ‘Userinterface instructie.docx’ before loading really large ontology’s like dbpedia.
- Before loading Fresnel, make sure Protégé has loaded the ontology the Fresnel style sheet was based on.
- Opening ontologies
- If you open a large ontology expand the lenses one by one. Do not activate the the right menu item ‘Expand all’
- If you want to open an ontology a second time, open in a new window (might incur failure otherwise).
- GUI
- Show the superclass in the gui to prevent problems with inheriting attributes.
- Make sure the lens boxes do not visibly overlap each other in the GUI. If they do, you may not be able to get the property menu when right clicking a property.
- After selecting the ‘Expand all’ menu item select also the ‘rearrange’ menu item to be sure that the lenses do not overlap.
- In a form, for properties (not of type page) with multiple values, separate values by a comma. Separate URL's for an image property by a space, then a comma.
User Manual
Getting Started
Startup
If, at the start of Protégé ,the tab of the plug-in is not among the other tabs in Protégé, the user must select the plug-in under 'Window > Tabs'. Next, the user must load the desired ontology into Protégé via 'File > Open', either via a URL or a local file. After this, the user can navigate to the plug-in tab where the Start menu is displayed.
Default Fresnel
The option 'default Fresnel' will generate a diagram that visually displays default Fresnel data for the loaded ontology. For each class, a lens is generated and represented by a 'box' in which all associated Properties appear in a list: the data properties in black, the object properties in blue. The lenses are structured hierarchically, in which the parent/child relations are indicated according to UML notation. The range of the object-Properties is visible when the mouse is above the specific lens box.
Load Fresnel
The 'Load Fresnel' option prompts the user to select an already existing Fresnel file. The file to be loaded must contain Fresnel data that fits with the already loaded ontology. If you want to read a Fresnel file that applies to another ontology, then first load that particular ontology into Protégé. After the file is selected, the diagram with the graphic representation of the Fresnel data displayed that the user last edited and saved. Hidden properties are displayed in gray, at the bottom of the list in the lens box (see 'Hide').
Save Fresnel
The 'Save Fresnel' option will save the Fresnel data from the chart - either default or edited - into a local Fresnel file. If the diagram has been edited by the user, all graphical data such as positions of lens boxes, sequences of properties and more will also be stored.
Structure
Moving and adjusting order
The lens boxes can be moved by moving them with the mouse. Adjusting the order of the properties is done in the same way. When lens boxes are placed over each other, they will automatically be assigned a place so that there is no overlap.
'Hide' (Properties And Lenses)
Clicking a property determines the visibility of a property (based on the Fresnel-property 'ShowProperties'). A property that should not be included will be grayed out after clicking. Also, a lens can be included or not and this one can do it by right-clicking the lens box button and the option 'Hide'. A lens that is not included are also grey.
'Add Property' (lens)
The next option in the second mouse button menu is 'Add property, with which one can easily add a property to the clicked Lens. To do this, you must enter the name and URI of the property and the place (index) of the property in the lens box. The new Property in the list on the correct spot.
Appearance
'Edit CSS' (lens)
The last option in the same menu is 'Edit CSS', in which five values for CSS style data can be filled in for a lens. This does not change the diagram, but this data gets included in the Fresnel file (see 'Save Fresnel').
'Relabel' (property)
If you right-click on a property, a different menu is displayed specifically for the clicked property. The first option 'Relabel' Designates another value to the Fresnel-property ' abel'. The result is visible afterwards The Clicked property.
'Change type' (property)
The next option in the same 'Change type' menu provides a list of types for the property. If you make a different choice for the type, this is not displayed visually, but is included in the saved Fresnel file (see 'Save Fresnel').
'Hide' (property)
The next option in that menu does the same as a left mouse button on a property (see 'Hide').
'Edit CSS ' (property)
The last option in the menu, 'Edit CSS', gives the ability to fill in four values for CSS style data for a property. This does not change the diagram, but this data is included in the Fresnel file (see 'Save Fresnel').
